


Basic cocktail equipment
Words by Simon Difford
As with most pastimes, a bewildering array of bartending equipment is available, but watch a bartender at work, and you'll find they use very few pieces of equipment. The vast majority of cocktails need either shaking or stirring, so you can pretty much get by with just a shaker and long-handled barspoon. Ideally, you'd also have a mixing glass, but you can just stir in the tin.
However, if you have the following items, you have the full pro-bartending kit. I've not arranged them in any particular order of importance, and many are far from essential. If on a budget, one of the items I'd forego is the blender, and with it blended drinks.

1. Measure (jigger)
Ideally, use a graduated jigger, but please be aware of how inaccurate some measures can be. You can check the accuracy of any jigger by placing it on a sensitive set of weighing scales. Zero the scales and then weigh various volumes of water. One millilitre of water weighs one gram, so 30 ml should equal 30 grams, 45 ml equal 45 grams, and so on.
Alarmed at how inaccurate and unsuited most graduated measures are to cocktail use, we have designed and made our own, the Easy Jigger. You can buy an Easy Jigger directly from us via EasyJigger.com. Our Easy Jigger measures from 1.25 ml (1/24 oz) to 60 ml (2 oz), with 11 increments in between marked in both millilitres and ounces.

2. Cocktail shaker
You can shake a cocktail using a jam jar. You can also start a fire with a couple of sticks but it's easier and quicker to use a match. Similarly, why would you want to shake a cocktail in something like a jam jar when the piece of equipment designed for the job is so affordable?
Cocktail shakers come in numerous shapes and sizes, but there are two basic designs: 'two-piece' and 'three-piece' shakers. Both do the job, but three-piece shakers are generally easier for beginners to master and have the added benefit of having a built-in strainer, whereas a separate hawthorne strainer will also be required when using a two-piece shaker.
That said, two-piece shakers are far superior, quicker to use and better allow for techniques such as reverse dry shaking. And when I say "three-piece shakers are generally easier for beginners to master", shaking a cocktail is not rocket science and certainly easier than many techniques employed in cooking. Please buy a quality two-piece, stainless steel shaker such as the Cocktail Kingdom Leopold Shaker Set, and beware of the inferior shakers peddled by many, if not most, high-street stores.
The two different styles of shaker explained:
Three-piece cocktail shakers
Three-piece shakers are also called 'Standard' or 'Cobbler' shakers, and they comprise of three sections:
- 1. Flat-bottomed, conical base or 'can'
- 2. Built-in strainer mid-section
- 3. Top cap or lid which seals the shaker
In 1872, the first patent for a cobbler-style three-piece shaker was granted in the United States. This style of shaker is preferred by Japanese bartenders and practitioners of the hard shake due to their relatively small capacity, limiting the travel of ingredients and ice inside.
Three-piece shakers with built-in strainers pour more slowly than two-piece shakers, especially if the drink being poured contains the pulp of muddled fruit.
Two-piece cocktail shakers
As the name suggests, a two-piece shaker consists of two flat-bottomed cones, one larger than the other. The large cone, or 'can', is made of stainless steel or silver-plated steel, while the smaller cone can be glass, stainless steel, or even plastic. If the smaller cone is glass, the pair is collectively known as a 'Boston Shaker', and if metal, then you have what is known as a 'French Shaker'.
I recommend 'tin and tin' (French) two-piece shakers over 'glass and tin' (Boston) shakers. If you do opt for glass, then don't buy a Boston shaker that relies on a rubber ring to seal. However, these devices demand a short period of practice for a new user to become proficient and a moderate amount of use before appearing slick in front of guests.

3. Hawthorne strainer
If you've opted for a two-piece shaker, you'll also require a Hawthorne strainer. These have a spring which runs around their circumference to help catch particles of ice and fruit created by the violent act of shaking. They also often have 'lugs' which rest on the rim of the shaker to hold the strainer in position when being used. Most designs of Hawthorne strainer incorporate a ridge or finger rest, which when pushed serves to secure the sprung-loaded gap between the strainer and the side of the shaker, so allowing finer particles to be caught.

4. Stirring/Mixing glass
There is much debate among bartenders as to the best vessel to use for stirring, with some preferring metal to glass. Metal heats up and cools down quickly, and in doing so uses minimal energy, so having little effect on the temperature of the finished cocktail. In contrast, heavy glass stirring/mixing glasses have more thermal mass, so absorb more energy from the drink being mixed. The heavier they are, the more energy they will absorb. Pre-chilling or freezing such glasses mitigates this effect, making them as good as, or better than, an un-chilled metal vessel.
Double-walled stainless steel stirring tins have superseded the previous single-walled versions, offering a better thermal solution, and unlike glass, they are unbreakable so should last a lifetime. While a double-walled stainless steel stirring tin has the best thermal properties and is more robust, both the feel and sound of the barspoon gliding smoothly around the inside of a stirring glass is more pleasing than metal on metal.
If a specially designed lipped mixing glass or tin is not available, a Boston glass (the glass half of a Boston shaker) or even the large base tin base of a standard shaker, will suffice.

5. Stirring spoons
Also known as a barspoon, there are as many different styles of stirring spoons on the market as there are stirring glasses. Some have spiralled stems, some have flat ends and others three-pronged fork ends. The key thing is for your spoon to have a long enough stem to reach to the base of the stirring glass while leaving sufficient length protruding above the glass to manipulate. Hence, look for bar spoons that are at least 30cm long, and as long as 40cm if you plan to become proficient at stirring two cocktails using one hand. Some bartenders even make stirring four cocktails with two spoons in each hand look effortless.
I prefer a stirring spoon with a 5ml bowl, 30 to 34cm long, with a spiralled shaft and a flat disc end. Such spoons allow ingredients to be floated when building a layered cocktail by pouring the liquid down the spoon's shaft, it's descent slowed by the spiral sending the liqueur around the spoon as it falls to then be dissipated by the disc across the surface of the ingredient below. That's tough to explain so see DiffordsGuide.com for a video demonstrating how this is achieved.
Some barspoons have straight stems without the spiral and these alleviate the painful wear on your ring finger from spiral stemmed spoons when stirring lots of cocktails.

6. Julep strainer
Julep strainers are best described as being perforated metal spoons which are slightly smaller than hawthorne strainers, so allowing them to fit inside mixing glasses. They are said to take their name from Kentucky gentlemen who would historically hold them over a Mint Julep to keep the ice and mint from their moustaches.

7. Fine strainer
I'm firmly in the camp that believe that shaken drinks should be fine strained to remove the tiny ice shards and other detritus which otherwise float like scum on the surface of shaken cocktails. That said, I'd rather have ice scum than have to use a ridiculously small 'tea strainer' with an overly fine sieve that takes ages for the liquid to flow through and clogs when straining fruit such as muddled strawberries.
I use Cocktail Kingdom's Coco strainers, the perfect size and capacity for straining cocktails and a tool that's also useful for removing pith and pips from freshly squeezed citrus juice.

8. Paring knife
You'll need a sharp knife for cutting fruit for squeezing, and preparing garnishes. I love Japanese carbon steel knives, but prolonged contact with citrus attacks their carbon steel, turning it black. A good stainless-steel knife will do, but I prefer ceramic knives such as those made by Kyocera, ideally with a blade length of around 13cm (5 inches), as this is short enough to allow precision shaping and trimming of fruit while being long enough to tackle a large pineapple or melon. However, beware, razor-sharp ceramic knives will not stand flexing or twisting motions and cannot be used for cutting hard objects. Also, whatever your knife is made from, it's best not to put it in hot washing machines.
Whether you choose a carbon steel, stainless steel or ceramic knife, also invest in a tool to sharpen it.

9. Cutting board
Food hygiene used to recommend the use of polyethylene plastic boards, but while these will withstand sanitising in hot temperatures and harsh cleaning products, the thin grooves left in them harbour bacteria. It is not uncommon to see white cutting boards turned black in bars, and if you spot such a board, I'd recommend drinking elsewhere.
Avoid glass cutting boards or any hard surface that will blunt your knives. Properly cared-for wooden boards are a traditional, attractive, and practical choice. Wipe them regularly with antibacterial cleaner and rub the board with coarse salt at the end of a bar shift before a thorough clean. Revive the wood with regular doses of food-grade mineral oil (poppyseed oil or linseed oil, not vegetable or olive oils).
Many chefs are now using rubber cutting boards, as they are durable enough to withstand cleaning in hot water and yet kind to knives. Unlike wooden or plastic boards, they also have the advantage of not needing to be placed on a damp cloth to stop them from slipping. I've a Notrax Sani-Tuff T45 Natural Rubber Cutting Board from the USA, but for home use, a traditional wooden cutting board remains my recommendation.

10. Citrus juicer
Let's face it, Jamie Oliver uses his hands so pretty much any citrus juicer will do. However, the best cheap juicers are the hand-held hinged type that bartenders tend to call "Mexican elbows" (Mexicans don't). Department stores sell these in various colours: green for lime, yellow for lemon and orange for oranges (you guessed it). You don't need a trio of sizes – a lime will happily sit in either the lemon or orange-sized device. (The large-bowled orange version is also used for pressing finely crushed ice to make ice shells.)
Alternatively, a lever-action pillar press such as those made by Hamilton Beach or Olympus (formerly called OrangeX) is by far the best tool to squeeze a variety of citrus fruit and even pomegranates at speed.
Whatever juicer you use, place a fine strainer over the container to catch the juice and remove unwanted pulp. If not removed, the pulp occupies a surprisingly large volume so measuring unstrained juice means you are slightly under measuring your juice.
I place coloured silicone wristbands around small shaker tins for each juice – green for lime, yellow for lemon, orange for orange, red for pomegranate, and pink for grapefruit. When needing juice for a cocktail, I squeeze a few fruits at a time, placing the appropriate coloured tin with a Coco Fine Strainer under a Hamilton Beach 932 Commercial Manual Citrus Juicer. When making cocktails, I continually squeeze fruit to replenish each tin as required.

11. Waiter's friend corkscrew
I would love to claim that I use a Chateau Laguiole Master Sommelier, but like so many others, I use a relatively cheap Waiter's Friend, which doubles as a corkscrew and bottle opener. These multipurpose tools also have a short serrated knife which is intended for cutting the foil capsule on wine bottles but is also handy for plastic seals on spirits bottles and helping open numerous other packaging challenges.

12. Swivel peeler
So called because their blades swivel so they always present at the correct cutting angle, swivel peelers are chiefly designed for peeling potatoes, carrots and such like in the kitchen but behind the bar they are used for cutting long thin slivers of peel, termed 'twists' from citrus fruits, most commonly lemons and oranges.
There are two designs of these peelers, one with the blade in line with the handle and the other with the blade horizontal to the handle, sometimes called 'Y peelers' due to their shape. I much prefer the type with the blade in line with the handle, and I like the OXO SoftWorks model, the tool that established the ever-growing vast range of OXO tools. That said, I use and favour the Microplane straight peeler due to it having a slightly curved blade that better follows the contours of a citrus fruit.

13. Muddler
Jokes about phallic-looking muddlers aside, all you need is a long, round shaft, such as a rolling pin. Elegantly shaped wooden muddlers look great but don't like continual exposure to water or dishwasher/glasswashers. I tend to use more contemporary-looking and robust stainless steel-shafted muddlers with serrated plastic muddler ends.

14. Nutmeg & spice grater
When selecting a nutmeg grater, perhaps look for the type that also has a compartment for storing your nutmeg so you know where the nutmeg is when you come to dust the surface of a cocktail. However, if you want to go high-end, Microplane makes a bewildering range of different sizes and styles of grater, and I highly recommend them.
15. Ice machine or ice trays
If you don't have a commercial ice machine that makes large 25mm /1 inch cubes, such as a those made by Cold Draft or Hoshizaki, then a silicon ice tray is the most important piece of bar equipment you will buy. Don't just buy one, even when making small numbers of cocktails you'll need ice from multiple trays or a stock of ice that has been harvested and stored from multiple refills of your tray(s). I recommend the Bar Original Silicone Jumbo Ice Tray. This has the usual floppy silicon mould that allows you to easily pop ice cubes out but unusually this sits in a ridged tray so making it easy to transport newly filled ice trays from the tap to your freezer without spillage.

16. Ice chest or receptacle
If working in a professional cocktail bar, then I'd hope you have a built-in insulated or even refrigerated stainless-steel ice chest with drainage. The drainage is as important as the insulation, as ice lasts longer if it is not sat in a pool of melted ice water. Sadly, these don't feature in your average domestic kitchen, so I recommend using a small 14-litre insulated plastic cool box, preferably one with a detachable rather than a hinged lid. When making cocktails, empty bags of ice cubes from your freezer into your cool box as required and then leave to sit for five minutes to allow the ice to temper before you start to use. The shallow ice box will enable you to scoop ice from the box into your shaker. Cool boxes are also handy for transporting your ice to a party.

17. Ice scoop
Now you've an ice chest, or at least a cool box, you'll need an ice scoop to move measured amounts of ice into your shaker. I use three ice scoops: one monster-size plastic one for taking ice from my ice machine and depositing it into my ice chest; a 12oz aluminium scoop for scooping cubed ice into my shaker or stirring glass; and a 7oz plastic scoop for crushed ice – the latter chosen because its small size is better for channelling crushed ice into glasses.
18. Ice tongs
A scoop is the quickest way to charge shakers and glasses with ice, but selecting individual cubes and gently depositing them with ice tongs allows the selection of perfect cubes to occupy each position in a glass. There are two types of ice tongs, sprung and unsprung, and both come in numerous shapes and sizes. Whichever you choose the key element is the design of the tips that grip the ice. Evolution has given birds talon feet to enable them to snatch their prey, and ice tongs with talon-shaped ends are a brilliantly efficient copy of what nature has perfected.
19. Garnish tongs/tweezers
Garnish tongs are basically a giant version of the tweezers you probably have in your bathroom. When I say giant they can be as long as 25cm (10inch) and they are handy for plucking cherries and olives from their jars, as well as for placing garnishes.
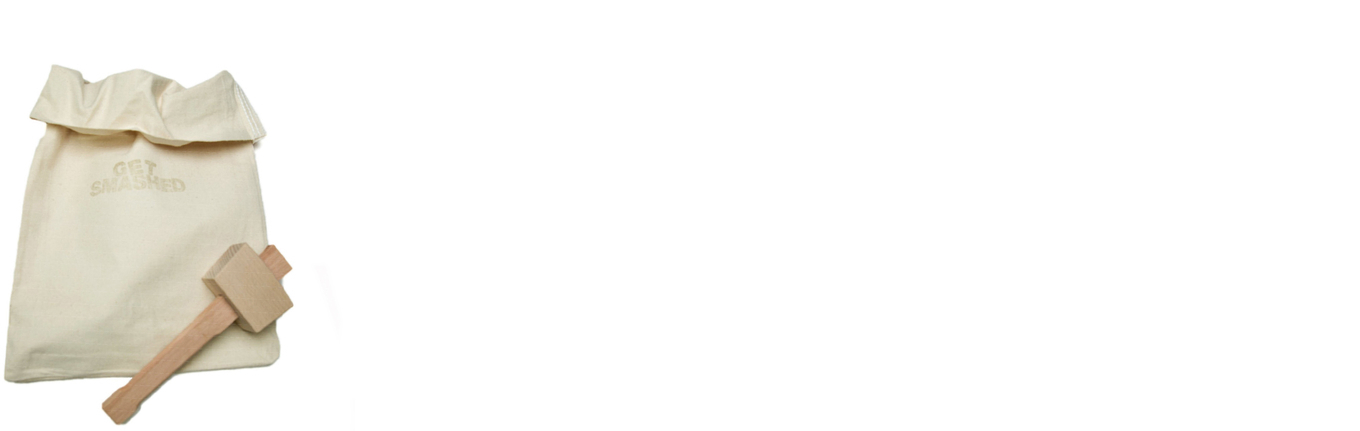
20. Ice crusher or wooden mallet & Lewis bags
In an ideal world, you'd have a crushed ice machine or even a mechanical ice-crusher. I use a beautifully restored vintage cast iron ice-crusher, and modern versions, both powered and hand-cranked, work in exactly the same way. If investing in an electric model, beware of the difference between an ice shaver, which makes snow ice, and an ice crusher, which produces chips of ice. You can also use a food processor to crush ice but do this too often, and you'll put a lot of strain on the motor and blunt the blades.
Alternatively, you can wrap cubed ice in a linen glass cloth and bash it into small chips with a heavy muddler or rolling pin. The same process is more efficient if you use a wooden mallet and Lewis bag. You may already have a wooden carpentry mallet and if you don't, look out for a vintage one or buy an ice mallet designed for the job. Lewis bags are made from thick canvas-like cotton and retain the ice in position while being beaten, as well as absorbing moisture from the ice. It's worth investing in more than one Lewis bag so you have dry ones available when making multiple cocktails.
21. Ice tapper
The other method for smashing ice into small chips is to whack each individual cube with an ice tapper. These have a weighed stainless steel disk at the end of a springy plastic shaft, and this is used to hit individual cubes held in the palm of your other hand. This produces larger fragments than ice crushers or Lewis bags, perfect for Caipirinhas.
22. Bitters dasher tops or bitters bottles
When you buy aromatic cocktail bitters they tend to come in bottles with either dropper or dasher tops. Droppers dispense consistent-sized droplets of bitters, but the holes in the plastic tops of dasher bottles vary in size tremendously between brands, and so does the size of the dash they dispense. For such bottles (e.g. Angostura and Peychaud's ) I prefer to prise out the plastic top and to dispose of it, along with the screw cap and replace with a screw-on stainless steel dasher top which produces more consistent dashes.
23. Atomizer
Atomizers are handy for spraying mists of bitters, vermouth, absinthe etc. into glasses ahead of filling with a cocktail, or coating the top of a cocktail with a fine aromatic spray.

24. Powder dredger
These containers with a fine meshed top are used in coffee shops to dust cappuccinos and are perfect for applying powdered chocolate, icing sugar, cinnamon powder and such like over the surface of cocktails.

25. Linen glass cloths
My mum calls these "tea towels", and they're what you see thrown over a chef's shoulder or tucked into the waist tie of their apron. They are as useful for polishing glasses as they are for drying hands and mopping up spillages. Wash at the hottest your machine will allow and don't use fabric conditioner as this will impede absorption and may leave streaks on your glasses. Keep a linen cloth to hand or affix to your waist by either pulling a corner through your apron strap or through a belt loop. (Wipe your hands on this rather than your trousers/jeans.)

26. Lipped saucepan
Not only handy for heating your soup but perfect for making sugar syrup and flavoured sugar syrups such as pomegranate (grenadine).
27. Wooden spoon
For stirring syrups, etc., in the afore-mentioned saucepan, I used to use a purpose-designed chef's stainless spoon with holes in it, but I'm convinced the metal-on-metal action of stirring adds a metallic flavour. However, wooden spoons can carry flavours from food previously stirred with them, particularly onion and garlic, so I now keep a wooden spoon dedicated to stirring syrups, and I suggest you do the same.

28. Funnel
Having used the saucepan above to make your sugar syrup, then (once you've allowed it to cool), you'll find a plastic, or ideally stainless-steel funnel useful to pour the syrup into an empty, clean spirits bottle. Vodka bottles are ideal as there's no need to clean if you've recently emptied one.
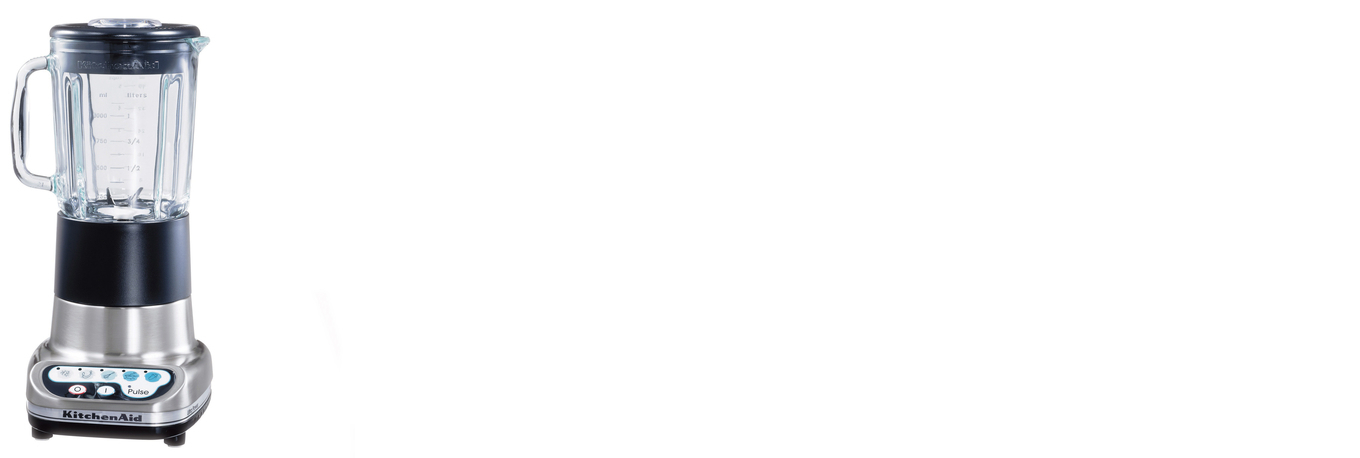
29. Blender
You'll need a blender for all those Frozen Daiquiris and Piña Coladas so choose one with a large capacity and a powerful motor. Vitamix may not be the best-looking but they are certainly powerful and tough. Your average domestic blender will not have the power to crush ice so you'll need to use crushed ice. However, a Vitamix will pulverise large cubes of ice straight from the freezer. Judge your blender by its electric motor's power (wattage) rather than how slick the stainless steel design looks on your countertop.
30. Swizzle stick
Some cocktails, usually served with crushed ice, require mixing with a swizzle stick. Swizzling drinks originated in the Caribbean, and originally, a twig with a few forked branches was used, usually from Quararibea Turbinata trees, which are native to the eastern Caribbean and are commonly called Swizzlestick Trees. Sticks made of metal or plastic with several blades or fingers at their base, or even a bar spoon can be used to perform the same function but they lack the charm and authenticity of a swizzle made from a Quararibea Turbinata twig.

31. Channel knife & citrus zester
I've a number of zesters and channel (canal) knives, but apart from cutting the odd horse's neck, I rarely use any of them. Even then, you can cut a horse's neck with a swivel peeler. However, channel knives are relatively cheap and many models have a dual function with a zester at the other end.
32. Cocktail picks
More items of barware than a bar tool, but these are used to skewer olives, cherries and other cocktail accoutrements. Wooden cocktail picks will do the job, but stainless steel picks are more suited for use in elegant cocktail glasses. Cocktail picks with decorative ends can also suit an occasion, from Christmas tree picks for the festive period to skull picks for Halloween or Day of the Dead.
33. Absinthe spoons
Absinthe spoons are another piece of serving ware and are essential for the iconic absinthe drip cocktail. At the time of writing, La Fée Absinthe comes with a free stainless spoon attached to every bottle, but you can also spend hundreds on silver-plated spoons.
34. Blue Blazer Mugs
If you're an adventurous risk-taker then perhaps invest in a pair of silver blazer mugs. These are handled mugs used to 'throw' burning alcohol into the air to hopefully be caught in the other mug. Please, please be careful, practice with water first, and perhaps have a fire blanket to hand. Also best do this over a non-flammable floor rather than a carpet.
35. Wine/vermouth/sherry preserver
You may already have a Vacu-Van or similar device for pumping the air out of re-sealed wine bottles to stretch the oxygen-sensitive liquid through to another day. Vermouth, sherry, and fortified wines are equally susceptible to oxygenation, so such devices should also be employed when resealing opened bottles. Each suck the air out or replace it with an inert gas from a canister.

36. Bag
Professional photographers' equipment bags are perfect for storing and carrying bar equipment. The one pictured by Tamrac is the one I've used for the past 22 years. It features padded sections originally designed to house camera lenses but are deep enough to accommodate shakers, mixing glasses, and glassware. An abundance of front and side pockets, designed for holding lens caps and other paraphernalia, snugly house bar spoons, measures, strainers and smaller bar tools. Visit any professional camera store, and you'll find a range of such bags.